In this article, We will learn in detail about SSl (Secure Socket layer), CDN (Content Delivery Network) and How can you configure the SSL and CDN to your website for Free using Cloudflare.
Cloudflare is a known name in the Internet industry. It provides you CDN through which you can speed up your website. Also, their SSL will give your website basic security.
If you are a beginner, Before starting the configuration of Cloudflare SSL. We have covered your all question like what is SSL,CDN, and their importance. Why It is required and all related stuff. If you know all these you can directly jump to the configuration of Cloudflare with your Hosting Provider.
What You will Learn in this Article:
- What is SSL and it’s importance?
- How is SSL securing your data.
- What is CDN and its’s use?
- Cloudflare CDN Configuration.
- Create a SSL certificate for your cPanel .
- Install Cloudflare SSL certificate in Cpanel
What is SSL and it's importance?
When you are browsing the Internet, You may have seen Some websites are showing Non Secure and Some having secured in Address bar. It is due to http, If website is only using HTTP (Hyper Text Transfer Protocol) for transferring the data, That will show Non Secure.
And If they use HTTPS. That is secure. Here S is the SSL layer added in HTTP.
SSL stands for Secure Socket Layer. SSL is adding the layer of security to your website. It will prevent your website from the attack of Hackers. It gives the Firewall protection, also prevent DDos attacks.
Now a days, Most of the transactions and data is in Internet including our Name, Address, Credit Card Number. It is good practice to not use the Websites who are not using the SSL because Hackers can easily fetch that data.
How SSL is securing your Data
There are many Hackers are trying to break the security of the IT platforms. It is essential to keep our Websites and Online data secure. SSL worked in 3 ways, Encryption, Authentication and integration
Encryption: SSL is using the encryption while Transferring the data from Server to server or server to Machine.
Authentication: It ensures, You are connected to correct server.
Integration: Also, the data requested is Transmitted is correct.
What is CDN and it's importance?
CDN stands for Content delivery Network. CDN is basically used for amplify the speed of websites. It is group of servers which are distributed on different locations.
Suppose, Any Website is using the Hosting service whose base Server is in USA. If the user from UK try to access the website. It may get some latency of milliseconds or microseconds. For reducing the Latency and speed up the website speed CDN is used.
When you configure the CDN for your website, It will not host your website but It creates a cache copy in Multiple server location. When any user try to access the website. CDN transfers the data from nearest server Location which speed up the Website.
Currently, Major of the Internet Traffic is using the CDN to speed up their websites. Amazon, Netflix and many Big names are using CDN.
Cloudflare CDN configuration
Cloudflare is providing Content delivery Network services to Websites on Internet. Now we will need to configure the Cloudflare CDN to your WordPress site.
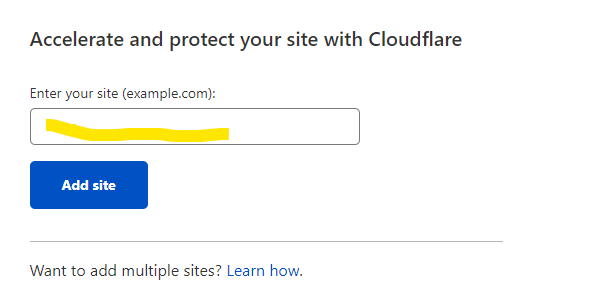
To start, You need to go to Cloudflare.com and use the Option sign Up. Create the account in Cloudflare with your email. Then you got an option for Add site. The website which you want to configure with Cloudflare CDN. Enter the site Name and Click on Add site Button.
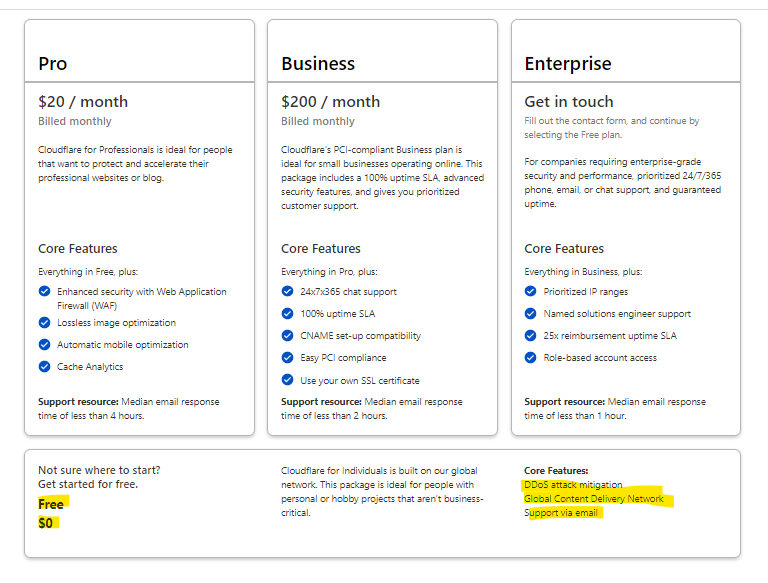
Next screen, You need to choose a Cloudflare Plan., You can choose the Free Plan or any paid Plan as per your requirements. If you are beginner, we suggest you to choose a Free Cloudflare plan as It is giving you CDN network and protecting you drom DDos attacks as well.
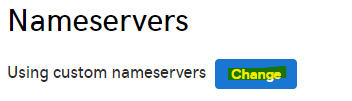
Now Cloudflare ask you to update the DNS records in Your Godaddy account. (Domain Registrar Account). Current DNS may be your Web Hosting’s Name Servers. and Need to add the CloudFlare Nameservers.
It will not remove the Domain from your Web Hosting account.
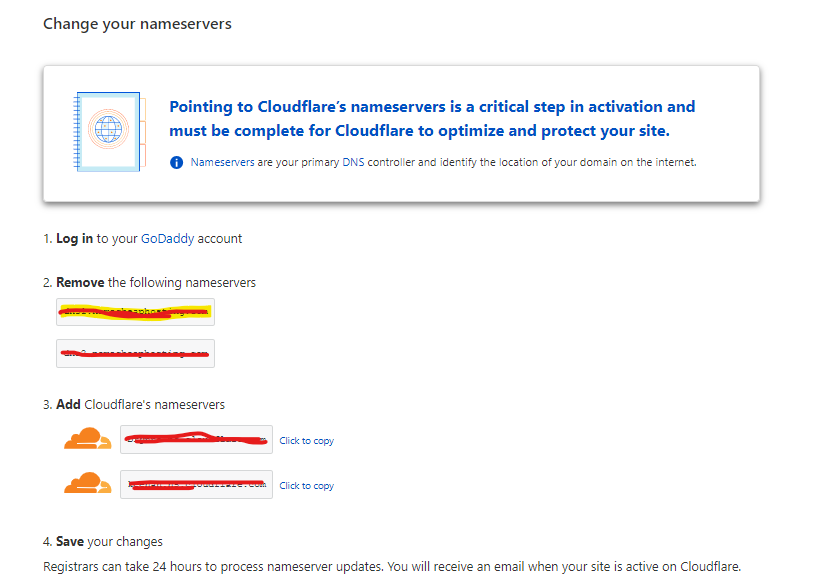
For the Tutorial Purpose, We are showing you to update the Nameserver in Godaddy account.
Most of the Domain Registrar have the same process for updating the Name Servers.
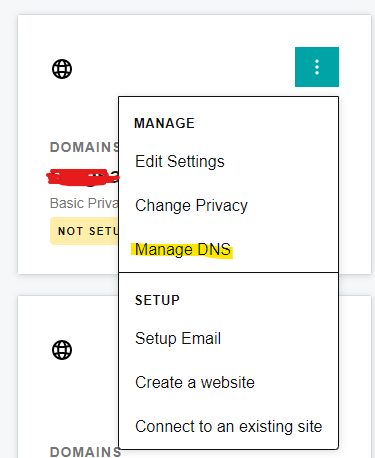
You need to select your Domain and Go to Manage DNS.
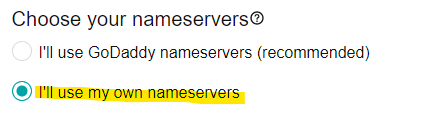
You need to click on Change and Click on I will use my own Nameservers. Update the Nameserver of Cloudflare.
Now again come to Cloudflare, start the Name server Check.
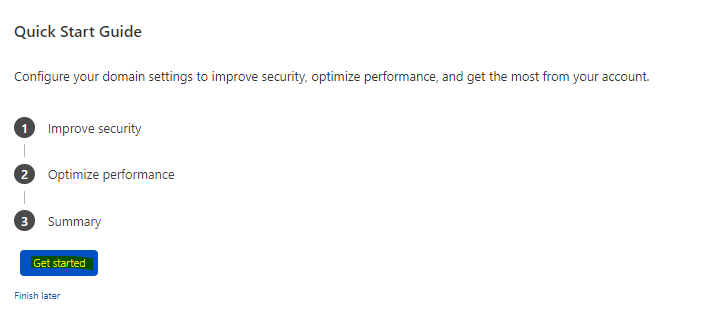
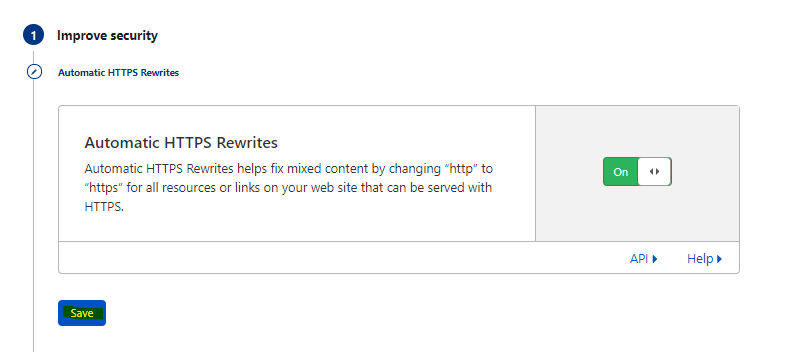
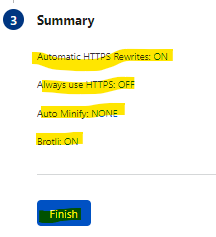
It will Improve the security, If your site is using http it will redirects to https, Below summary, You will get in it.
Now your website is protected by Cloudflare.
Create a SSl certificate for Your CPanel
Your website is Now connected with CDN, You can also create a SSL certificate in Cloudflare for your website.
- Login into your Cloudflare account.
- Select your website.
- Select the option of SSL/TLS

- Go to the option in Client Certificate.
- Click on Create Certificate.

You will get the option of 15 years or shorter. You can select and click . Now the Certificate and Private key is generated.
Paste it in Notepad, It is need to upload in Cpanel.
Install Cloudflare SSl certificate in Your CPanel
- Login to your cPanel Account where you want to install the SSL.
- search for the option of SSL/TLS
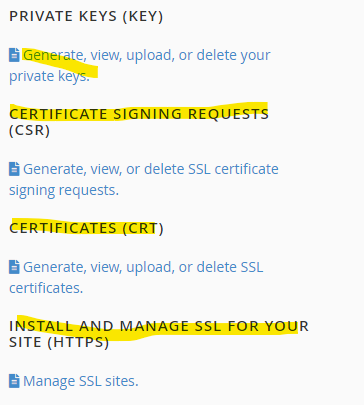
- Need to upload private keys first, Click the hyperlink: Generate, view, upload, or delete your private keys.
- When you scroll down you reach option for Upload a New Private Key. Paste the Private key you got from Cloudflare.
Also, you can add the description below which can help to identify the Private Key Later - Click Save
- Return to the SSL manager
- Click the hyperlink: Generate, view, upload, or delete SSL certificates
- Click on Upload a New Certificate Paste the certificate into the following text box.
- Add a description if you like.
- Click Save Certificate
- Return to the SSL manager
Now Your Private Key and Certificate are saved, select the Option of Install and Manage SSL for your site (HTTPS).
- Click the hyperlink Manage SSL sites
- Browse Certificates and select the certificate which you have uploaded recently then click use Certificate.
- Sometimes You will get a warning The certificate does not match your selected domain. (This will cleared in Next step)
- In drop down List choose the Domain and save it.
Now You are successfully Installed SSL Certificate for Free in your CPanel. And all traffic is encrypted Now with SSL.