In this article, We will learn, How can we create a Page in WordPress using WordPress Block Editor which came with default with the current version of WordPress. Creating pages in WordPress is very easy and simple. We will cover all the features which you can use while creating and adding a new page in WordPress. Also, you can modify your existing WordPress pages. Make sure It will not break anything.
Adding a New Page in WordPress
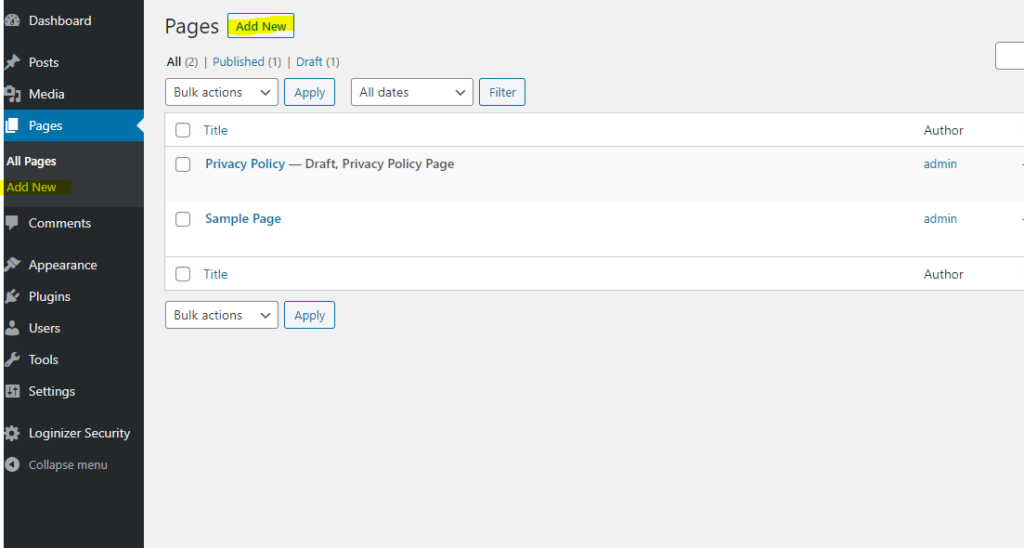
You just need to login in WordPress Dashboard using your Wp-admin Login Credentials. Click On Pages on the left sidebar and Click Add New.
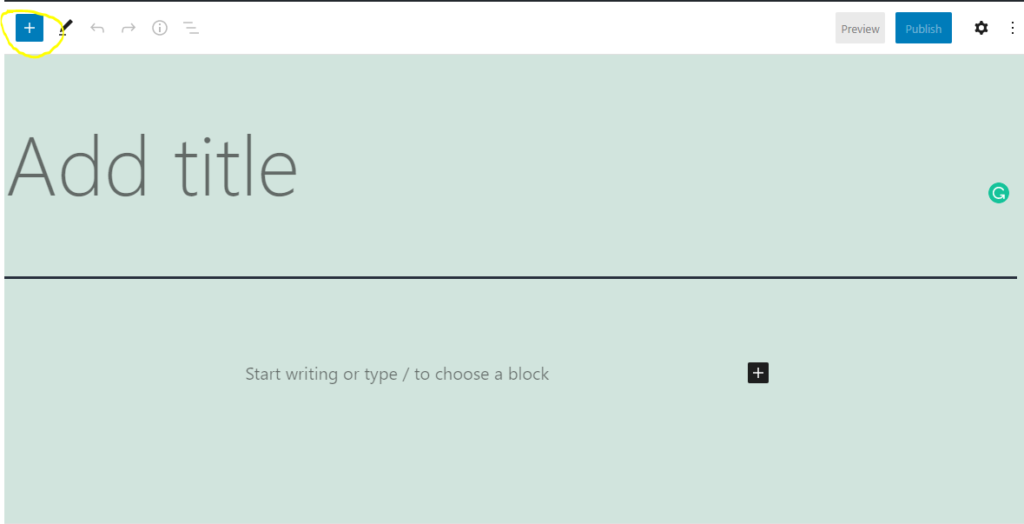
After Add New, the Below screen will Open, You will see the + option here. Click on + it.
You will see Multiple options for building a WordPress Page. These are called WordPress Blocks. You will find the Blocks for all types. Like Inserting the paragraph, Heading, List, Images, Videos and a lot more. This you can be browse all and learn. This is very simple and easy to use.

You will see Multiple options for building a WordPress Page. These are called WordPress Blocks. You will find the Blocks for all types. Like Inserting the paragraph, Heading, List, Images, Videos and a lot more. This you can be browse all and learn. This is very simple and easy to use.
Articles you may Like.
WordPress page Editor Blocks:
Here is the list of Important Page Blocks: This is very simple, No coding is required to work with these Blocks. You can easily work with the Blocks and can design your page of your Choice.
- Paragraph: When you will start creating pages, This will be the most used page builder Block. This Block is used for adding and inserting paragraphs in your content.
- Heading: As the name suggests, With the help of this block, You can create headings H1, H2, H3, H4, H5 and give the visitor.
- List: You can create content in a list format, Like Bulleted or Numbering and many more..
- Image: With the help of this Block, You can insert the image on your page. Using media Library or the URL of the Image.
- Quote: You can Highlight the content with quotation marks.
- Code: In some scenarios, You need some code insertion in your page.
- Table: If you need to show your content in a Tabular Format.
- Galley: If you need to show multiple pictures in 1 frame, Gallery Block will helpful.
- Audio: You can insert the audio file from here.
- Buttons: You can use this for inserting the Buttons on your page.
- Widgets: There are Multiple widgets are coming with the WordPress page builder, Like the latest Posts, Categories, and many more.
- Embed Links: You can embed links to various social platforms like Twitter, Youtube, Flickr, Reddit, and many more.
WordPress Page Settings:
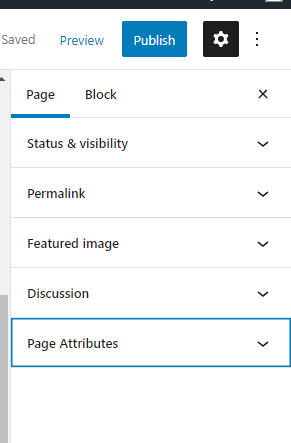
After Creating a Page using the Above Blocks, You Can configure Page settings of your own choice, Preview the Page, and many More. You need to Click the Setting Option on the Top Right of the page.

Here You can see the All Settings of the WordPress Page.
- Preview
- Publish
- Status and Visibility
- Permalink
- Featured Image
- Discussion
- Page Attributes
Page Visibility Settings:
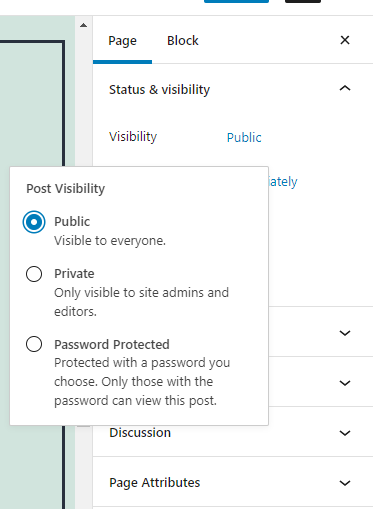
In the Status and Visibility Option, You will find the Option of Visibility. When you click on Visibility, You will see 3 Options. Public, Private, and Password Protected.
- Public: This will be visible to everyone.
- Private: This WordPress Page will be visible only for site admins, Editors and Privileged Users.
Password Protected: If you use this setting, It will make the page password-protected, the password is required to access that WordPress Page.
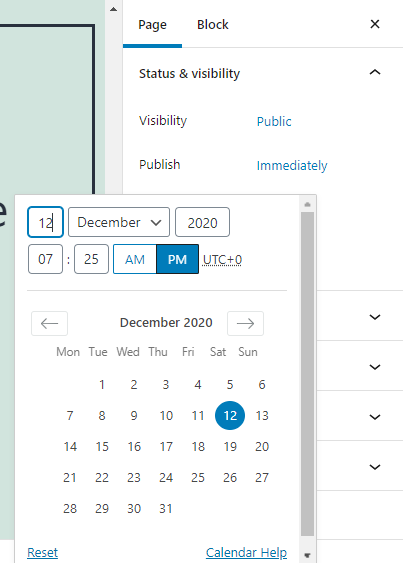
Schedule the Time of Plublishing Page:
In the Status and Visibility Option, You can set the schedule of your page, When It will get Published. You can select the Immediately or select your required date and time to get published.
This is a very simple click on Immediately. The calendar will be got open. You can set the date and select the time. Also on the right side, you need to check the TimeZone. Select your required date and time. The WordPress page will get published.
Permalink:
Permalink is a short form of Permanent Link. You can change the Permalink of the WordPress page which you design and Created. This is the URL of the page. If you will not change in Permalink. It will create automatically as per the settings of WordPress. This will be the URL of your page.
Few things you should always remember while creating or changing the Your website’s page Permalink. (Recommended for SEO Purposes).
- URLs should be short.
- There should be keywords inside the URL.
- Don’t change the URL of your page. It can break the links where your Page URL is there.
Featured Image:
From this option, You can upload your Featured Image for your Page. There are some things which you need to remember while uploading a featured Image.
- Featured Image in the Post and Page is also called Thumbnail.
- When you Set the featured Image, This is the first thing, Visitor will see and It sets the tone of the visitor.
- Make sure your featured image is well optimized.
- If you post the url of your page or Post, Featured Image will come by default with this.
- When You list the pages or post in sidebar or in specific Page. Featured Image creates a Thumbnail. Always make sure pages Featured Post have the same dimentions of Image. Otherwise It creates uneven look.
Discussion:
Here You got an option of Allow Comments, If you want visitors to your website can comment on your page. You can check Mark. Otherwise, You can just leave it blank.
Generally, on Pages, Visitors cannot comment. In Posts/Blogs, Visitors comment and discuss.
Page Attributes:
In a Page Attribute metabox, You will find 3 Things. Parent Page, Template and Order.
Parent Page:
With that option, You can arrange a hierarchy in your pages. Like you have page Our Services. You can create a child page WordPress of our services page by giving the parent page name. You can make create multiple child pages for 1 parent page.
- http://your-website.com/our-services/wordpress/
- http://your-website.com/our-services/linux/
- http://your-website.com/our-services/web-devlopement/
WordPress, Linux, and web-development are child pages of Our services in the above example. Also, You can create a child page of a child page, Like this.
- http://your-website.com/our-services/web-devlopement/angular-js/
You can create nested pages (Parent-child relationship)as fas as you need.
Template:
From this option, You can select the template for your WordPress page, like default, full-sized, boxed, or any other type. These options come with the theme which you are using on your website. You may get other options for custom and page layout like contact page, archives, blog, and other options. It depends on your WordPress theme which you have installed.
Order:
As the name suggests, This feature of WordPress is used for ordering the WordPress pages.
If you have multiple pages on a website about us, our services, contact us pages in your website and you want to create the ordering of these pages.
- Open a page in the WordPress editor.
- Go to the Page Attributes option.
- Give Order#: 1 or 2 or another number of your choice.
- Update and save the page.
- In the same way, update other pages as well.
Now your page menu will show pages of your selected order.
Preview:
In the top right corner, You will see a button of Preview. When you click on it. It will give the actual display, How will your WordPress page look to the visitor. You can do proofreading, check the font size, feature images, and check the other setting before publishing your WordPress page.
Publish:
After Clicking on Publish Button. Hurray !!! Now your WordPress page is published. You can check your page with the URL which you have given in the slug option.
This is all from Creating and adding a New WordPress page on your website. Let us know your thoughts on the comments.